Hi there! Thank you for taking the time to read through my short and (hopefully) informative walkthrough on setting up your own blog or website. In this article I’ll go over the main aspects of running a custom site, how to start posting content, and even make money doing it.
As you may or may not know, both my wife and I run blogs as our main source of income. Within a year of starting up, were able to leave our careers in the publishing industry, supplement our income, and we even get to work from home and raise our son together. A fair warning, this is not for everyone. It takes a lot of hard work and commitment to be successful. Luckily, up front costs are minimal and setup is relatively fast. Read along and I’ll explain:
Step 1: Hosting & Domain

First things first, a little lesson on how websites work. When you type in a website address, a lot of things happen behind the scenes. The address (URL) is actually a type of shortcut that points to a public computer (server), and sends back the pages, images, links etc as code to your browser that then displays it as a webpage. First things first, we’ll need to get you a domain (a .com address – or any other extension) and hosting service (the server that holds your website files, database, even emails tied to your domain name). While it sounds like it should cost an arm and a leg to lease website server space, it’s actually extremely affordable. I’m a firm believer that everyone should have a website to host files, share photos, and maintain a constant online presence outside of social media. The easiest and most flexible place I’ve found is Bluehost (they offer a free domain with hosting service, which starts at $3.95/month).
When you arrive on the Bluehost site, just click the big green “Get Started Now” button. You’ll be presented with three options. I highly recommend the “PLUS” plan in the middle for a number of reasons ($6.95/month to start at time of writing). First, you can actually host as many websites as you would like with a single plan, you get unlimited email accounts ([email protected]), and the speed benefits of a built in CDN (if you don’t know what this is, it’s okay – it just makes your site load a bit faster).
On the next page, you’ll be able to pick a new domain name to register. If the domain name is taken, it will give you a notice and have you retry. If you have already purchased a domain, you can type it into the box on the right and continue (make sure you type it in correctly!).
As you finish the setup, you’ll have the ability to set a term for the hosting, and select add ons. These add-ons are all optional. Some people may find value while others don’t, and you can add them on later if you decide you want them.
Step 2: WordPress

After signing up and logging into your new hosting with Bluehost, you’ll be able to use the “Install WordPress” button in your hosting dashboard to set up your new blog in a couple clicks. A few short straightforward questions (including the blog name and an admin username and password) and you’ll be set. You can change all of these later, don’t worry.
Congratulations, you have a live website now. At this point, when you type in your website’s address, it should show a generic blog with the title you chose during setup. If your site is not loading, give it some time or try a different browser. Sometimes it can take a couple hours to propagate online.
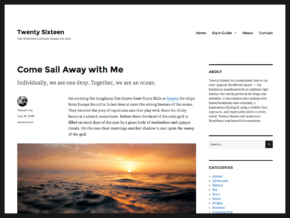
You’ll probably notice that your blog is not the prettiest at this point and looks something like this:
We’ll fix that next. WordPress uses a theme system to completely customize the look and feel of your site. A good looking blog or website depends entirely on the theme that you’re using on it.
Do Not Skip This Next Step.
There are a lot of theme marketplaces available but my far and away favorite is Themeforest. It has the biggest selection with dozens of new themes uploaded every day. Prices range from $25-60 for a high-quality WordPress theme and often include support, bundled premium plug-ins and features, and a more unique and high-end look than all of the free themes floating around the web or in the WordPress marketplace.
The theme I currently use is called Boroda. I didn’t change much after installing and haven’t come across any other sites that use it. After purchasing your theme, be sure to download it and read all of the instructions thoroughly. Inside the files you’ve downloaded, you’ll find a zip file of the theme itself. Remember the location of this file as you’ll need it in the next step.
Login to your site by going to https://yourdomain.com/wp-admin and entering your username and password (you set these when installing WordPress earlier). On the left menu panel, go to Appearance>Themes. Click “Add New” at the top and then “Upload Theme”. Choose that zip file of the theme itself and click “Install Now”. The set up of every theme is different after install so be sure to read your theme’s read-me instructions and contact the theme’s developer if you run into any issues configuring or setting up your specific theme.
Step 3: Tinker

Make your site look and feel the way you want it to. Delete the dummy content, write some articles, upload photos, get used to the way WordPress works. It’s surprisingly intuitive and if you get curious, simple Google what you want to find out. WordPress is so widely used that there are probably thousands of other people that have ran into the same scenario.
This is the chance to make a logo, look through plug-ins to add functionality to your site, or trial-and-error different techniques for social media or promotion.
Depending on how ambitious you feel, now would also be a good time to pick up Adobe’s Creative Cloud Photography plan (only $9.99/month) and includes Adobe Lightroom and Photoshop. These aren’t absolutely necessary, but make life a lot easier as you progress and are both great to learn as you continue to grow your blog.
Step 4: Photography
If you’re planning on using your own photos on you blog (please do this), you will need a good camera and lens. There are a ton of options here so I’ll explain what I use and why.
First, I’ll say that I’ve been taking photos and videos professionally for several years now, and while I’m not the world’s greatest photographer, I know the ins and outs of getting a solid photo using minimal equipment, time and cost.
My main camera is the Sony a6000. It has an incredible APS-C sensor, is a bargain to buy and is extremely versatile. You can pick up just the body (or packaged with the 16-50mm lens) and also grab the Sony SEL35F18 lens. I cannot express my love for this lens. It’s a prime lens (meaning it doesn’t zoom), but has a big f1.8 aperture, which will give you that buttery shallow depth of field that makes an average photo look extremely professional. I’m not exaggerating when I say that nearly every photo on my blog was taken with the a6000 and that lens.
If you plan to do any amount of product shots, food/cooking shots, or at-home portraits, you absolutely need to pick up this super cheap lighting kit. You won’t use it for every article, but there’s nothing more satisfying than being able to properly light a shoot and nail the execution simply because of your awesome lighting setup.
Step 4: Establish Yourself

Now is the time when the actual work starts. Write every day, take photos, set up your social media accounts, explore your area on weekends or other available times. Right now, quantity is more important than quality. Stay active daily on your social media accounts. Make sure your handle and image is consistent throughout different networks so that readers have no doubt who you are.
Don’t share your new website yet though. It’s tough, I know.
First impressions are important. Blasting out your new site with only one or two articles to your close friends and family will not have nearly the same impact as sharing an article from your already established site. Similarly, write your articles and and establish a good 15-20 stories before linking all of your growing social media accounts back to it.
Step 5: Join Influencer Marketing Networks

As you are growing and posting more and more, make sure you are noticing your site’s traffic and your social following. WordPress has a decent stats system built into it, and Google Analytics provides more extensive analysis of your site’s performance, but can be a bit daunting for people unfamiliar with the system.
The best way to start making money right away is to use influencer marketing companies to partner with brands and create sponsored content on your site and social media channels. This step should only be taken once you have a couple dozen articles on your site, with several that you’re especially proud of, and a sphere of influence of a couple thousand people.
I work with several networks, including Linqia, Social Fabric, Influence Central and Weave Made Media. Each have their strengths and weaknesses, so be sure to try each out and see which work best for your style and website.
You should also join Adsense or Media.net to display ads on your site. Be warned, unless you’re getting 100k+ views per day, you’re not going to make much money off of this source. But it is good to have set up in the off chance that a post goes viral, you’ll be able to see something come of it. Most influencer networks don’t mind a few non offensive ads on your site also.
Step 6: Make Friends

Communicate with people online, follow and comment on blogs that you like. Collaborate and make friends. The less isolated that you are, the better chance for success. Find similar blogs to yours and reach out to the people that run them. Find other bloggers in your area and meet up with them. Plan collaborative articles. All of these things will help you to succeed. The more people who realize that a rising tide lifts all boats, the better.
Most importantly: Blog about everything! Going to the zoo? Spending a weekend away? Starting a new project? Take good photos and post about it. The article doesn’t have to be long or perfect, and it’s better than nothing. You’ll notice that with time the quality will improve substantially and you’ll find yourself looking for things to do that will work for your blog.
Need Help? I’m Here
I’ll be regularly updating this article as I think of more and better solutions to getting your blog up and going. I’m also a designer & developer and can help you with WordPress installation, theme installation, content creation and more. If you have any questions or want a little personalized help, feel free to email me at [email protected]. I also provide an entire setup package for people interested in a turn-key solution.
Thanks for taking the time to read this article, I hope you find it helpful and I wish you all of the best of luck on your journey toward blogging success!


